Monday, November 5, 2012

Reupholstering a Chair for the Guest Room - Part 3

If you are just joining us, make sure you check out Part 1 and Part 2 first.

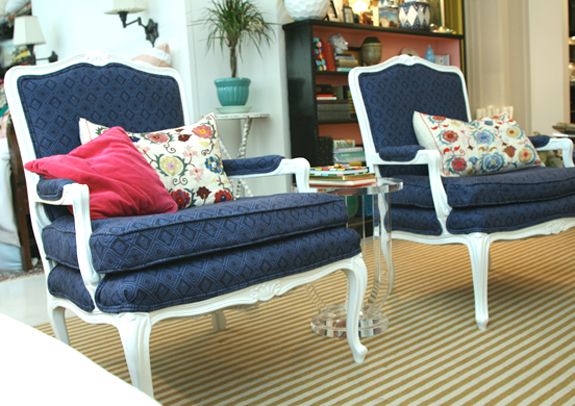
Next step in reupholstering is sewing and painting!


Here is what your chair should look like currently.

I'm going to apologize in advance, I didn't get as many pictures and I would have liked because by this stage I was just ready to get the chair done.  The good thing is that it's pretty easy to figure out from this point on, you just need to follow the pattern and reverse everything that you took off.


Friday, August 3, 2012

Reupholstering a Chair for the Guest Room - Part 2

 Time to tear things up!  This is one of the most tedious things on this project.. but for me it was the funnest!  You get to tear things up? Yes please!  I don't know why but breaking things/tearing things up always make you feel a little better, am I right?


Let us begin!

You will need:

  • A chair! - Preferably something your not afraid to tear up.
  • Pliers - Needle nose helps.
  • Fabric
  • Stapler
  • Sewing Machine or Needle and Thread
  • Flat head screw driver
  • Primer
  • Paint

Here is where we started.


If you notice I put down a sheet, this is to catch all the icky stuff that comes out of the chair. (If you also notice the dirty floor that is from mudding, yes I have mopped, three times!! Anyone have any idea how to get it clean?)


Friday, July 27, 2012

Reupholstering a Chair for the Guest Room - Part 1

I bought a chair at off of craigslist and I here are some ideas that I wanted to do with it... and some awesome reupholstering jobs!

Found this on Pinterest, this is what sparked the idea to do something for the guest bedroom.  Thank you for the inspiration!
Then I saw this tutorial and it really made me feel like I could get this done.  It has 5 parts to it so you need to read them all!  Start with this one.
Then I saw this and KNEW I had to do it!!  I just discovered this blog but I love it!
Here is the type of chair that I'm working with, so I used this tutorial here to help!

So here is what I'm starting out with.  You'll have to keep checking back to see how it turns out!

A little worse for wear right?

Is there anything new you have been working on?

Have you reupholstered a chair?  How did it turn out?

Show us!

Wednesday, July 18, 2012

Great Grandma's Recipes - Homemade Apple Pie

OKAY... So I debated on this awhile... I wasn't sure if I wanted to give out my family recipes, keep it in the family and all that what-not.

Then I thought.. why not?

Why not share some of the amazing things that I grew up knowing and loving, with you?

These recipes will always and forever remind me of a being a child and going over to my grandma's or great-grandma's. Please feel free to use them but if you do, note where they came from and let me know how it turns out for you!


Homemade Apple Pie


Ingredients -  

          Crust:

  • 2 cups all-purpose flour
  • 1 teaspoon salt
  • 3/4 cup shortening (Crisco is what I use)
  • 4 tablespoons cold water

          Filling:
  • 8 Apples (Generally Granny Smith)
  • 1/2 cup unsalted butter
  • 3 tablespoons all-purpose flour
  • 1/4 cup water
  • 1/2 cup white sugar
  • 1/2 cup packed brown sugar
  • 1/8 teaspoon ground nutmeg
  • 1 tablespoon lemon juice
  • 3/4 teaspoon cinnamon

  • 9-in pie tin/dish


I start with peeling and coring and slicing the apples into a large bowl.
Preheat the oven to 425 degrees Fahrenheit. Start with the crust first, in a bowl, combine flour and salt.
Add in Crisco, you can use the regular shortening like mom used to cook with or you can add the baking sticks, I've used them before and they seem to work pretty well! Plus, on the side of the stick it tells you how much it is on lines so you can "cut out your cup."
Gradually add cold water, and mix until dough forms a ball. I generally like to do this part with my hands because it makes me feel like a kid again and it makes baking fun!
You need to chill the dough for 30 minutes, so while you do that you can make the filling.
Melt the butter in a saucepan, then stir in flour to form a paste. Add water, white sugar and brown sugar, and bring to a boil. Add nutmeg, cinnamon and lemon juice. Reduce temperature and let simmer.

On a floured surface, roll half of dough out... grandma said to make a circle with the dough but well... that's near impossible for me, so just roll it out until you can cover the bottom of a 9-in pie pan/dish.
Take the filling off the heat and add it to your sliced apples and mix together well. Make sure all the apples are covered and then pour the mixture on to the crust in your pie tin/dish.
You can do the top how ever it suits you. I like to do the lattice but it's easier to just cover it and cut slits.
To do a lattice cover I find it easier to start in the middle and work your way out.
Roll out your dough and cut about 1-in slices.
Lie your first layer of dough slices evenly spaced apart on top of the filling.
We'll say the slices are north to south.
Then, grab a long dough slice and lie it in the middle facing east to west, in the center. Pick up every other dough slice and weave in the new dough slice.
I find it easier to just pick up every other one and lightly fold it over, just make sure it doesn't stick to itself, and lie the dough slice in the middle and then fold it the pieces back over the new slice.
Keep repeating the process for both sides until the whole top is covered. (I will include step by step pictures next time I make a pie.)

Pinch the ends of the dough slices to the bottom crust to for the edge. I like to pinch and roll the edge and use my finger indents to make it look a little "fancier". If your just cooking it to eat up soon and it's just you and your family, you can just pinch it to make sure it's shut ;).
(Optional: Melt about a tablespoon of butter, mix "a pinch" of cinnamon in and brush it on the crust. This 
should a a little flavoring and give it the more brown color and crunchy crust.)
After the edge is sealed, put the pie in the oven on 425 degrees Fahrenheit for about 15 minutes. Don't cook it too long or you'll burn the edges. If your edges are getting brown a little too quick put some foil around the edge just over the crust, don't put it over the whole thing.
After 15 minutes, turn the oven down to 350 degrees Fahrenheit and cook for another 30-45 minutes. I usually do about 30 minutes, but every oven cooks differently (Even if it's set on the same temperature).


Viola!

If you look at the pictures you can see the different ways that I cook and how each one turned out. Yes, they are all different pies. The first picture is with out the foil and didn't cook for the full 45 minutes. Second, covered with foil and didn't cook the full 45 minutes. Third, I didn't cook with foil and let it cook for the full 45 minutes.

I hope you enjoy your new recipe from my Great-Grandma's Recipe box. How did yours turn out? Does it taste how you would hope? Do you have a new recipe to add to your recipe box? Please, let us know! I'm going to be adding more recipes here soon, so keep watch!

(Please, if you want to share your experience with the recipe on your blog, pinterest, or any other social media make sure you let everyone know where you got it, it's only fair that my Great-Grandma get credit for her recipes.)


Friday, July 6, 2012

Awesome Cleaner or Stinky Mess? - Tub Cleaner

After finishing the bathroom painting and decorating I was horrified at our bathtub.  We had to stand in it to paint around the top of the tub and between the dust from the walls from sanding the mud, the dirty feet from going in and out with the paint and the dog and cat running around all over, it was sad to look at.

  Here's the before:


It's terribly dirty isn't it? I'm a little embarrassed by how dirty it is, but I need to show you the before so you can see if it works or not, right?


Here's the shower in our bathroom.  After getting dirty in the garden and all the yard work it's started to stain. :(  Not good!!   So I wanted to clean this up too.


I found this pin, that linked to this site, to show you how to make a bathtub cleaner. Here's the recipe:

1/2 Cup Vinegar
1/2 Cup Dawn dish soap
Spray Bottle


It has the recipe with the Cleaning Vinegar and the blue Dawn, but I didn't have either of those so I substituted :)  Besides the dragon fruit Dawn helped to cover the smell of the Vinegar.  The Vinegar was $1 and the Dawn was $2 at the store! Not to shabby, I say!

The recipe says to cook the Vinegar in the microwave for 90 seconds. Which I don't know if you know (Heck, maybe you knew before I did!?) but when you cook vinegar in the microwave it actually cleans your microwave!!  Awesome right?  Kill two birds with one stone ;)  The only thing you need to do it just wipe it out!

Okay, so I don't have a microwave anymore... but I do have a pan and stove top!  So I cooked 1/2 a cup of vinegar until it just started to bubble (it's stinky, fair warning!).  Just to be safe make sure you pour it into your spray bottle over the sink.  Once you get that ready in the bottle measure out 1/2 a cup of dawn dish soap (it doesn't have to be perfect, no worries!) and add that to your spray bottle. Then, shake it to mix it all together.

Spray your mixture all over the tub and let it set for 1-2 hours.  It says in the recipe to just wipe it down and then wash with water.  I actually changed this part a little bit.  I sprayed the mixture in the tub, on the fixtures, on the walls and on the door of the shower, I also sprayed the sinks down.  I wanted to see what all it would clean!

Look at that yucky sink!  I had to clean that, it was driving me crazy.  So I sprayed it down with the Vawn (hehe, just made that up.. like it? Sounded better than Dinegar or Vawnigar, haha!)

So, we were getting ready to head out for the 4th of July festivities, what better time to spray the bathrooms down?  That way we didn't have to smell the vinegar smell and it could soak for awhile.  Well.. the party ran longer than expected, so the tub, shower and sinks got to soak over night.  I know it was only supposed to soak for and hour or two but I figured it's pretty dirty so 12 hours wouldn't hurt it, right?

  So are you ready to see the changes?
 **Drum roll**


Monday, June 25, 2012

Brooders

So we really got down to business this weekend.  We got all of the supplies ready to build the flight pen and we built two new brooders for the chicks.  We also knocked down the old OLD chicken coop.  We tried to save as much of the original wood as possible to reuse, but it was pretty difficult with all the bug damage :(  I think we may only be able to save 1/4 of good reusable wood.. MAYBE 1/2 of it.

I took these while we were taking a break from building the brooders,


Look at those at those sad eyes!


 The Quail are getting big!

The bottom brooder we have the Chukar and the top brooder we have the Quail.  The Pheasants are still to little to be out from under the heat lamp.  So far we have lost 8 of our Pheasant :(  Next year we're getting all different kinds of chickens.  We wanted to get a white peacock, they're good for bug control (especially ticks!) but the place we're ordering from you have to buy in "bulk" and they can't guarantee you'd get a white one because they're mixed :\ darn!!  So if anyone knows a breeder that would want to sell one could you let us know? We'd appreciate it!

Want to see why we'd like a white Peacock besides the fact that they're good little bug hunters?


B-e-a-uuuutiful right?! Check this out...


Neat, right?

By the way for those of you who are unfamiliar with what Quail, Pheasant or Chukar are (I didn't have a clue what Quail looked like or what Chukar even were until we got ours) here are some pictures and a little info!

Quail - http://en.wikipedia.org/wiki/Quail

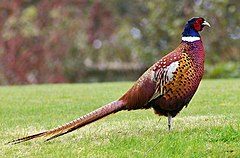
Pheasant - http://en.wikipedia.org/wiki/Pheasant

Chukar Partridge (These are my favorite cause I love their coloring) - http://en.wikipedia.org/wiki/Chukar_Partridge

Tuesday, June 19, 2012

Setting up a Program

I know it's been awhile since we brought home the horses, but with Athena getting hurt and then repairing the barns, mower, weed wacker, fencing, chopping down trees, hauling scrap metal and all kinds of left behind items (left by the previous owners), and painting the house we didn't have too much time to work with the horses and get them on a program.  So we had John, the horse and dog trainer, come out.  Funny thing is when I first met him he told me he grew up with the girl that we bought our horses from!  Crazy right? 

So setup with a nice program, some new information from Clint Anderson and a new friend (Thanks John!).
We are ready to get busy!

Just keep in mind though, all three horses are still "babies", they are not quite old enough yet that we want to ride them,  they are able to ride but we would like them to grow a little more first.  So we will be getting them ready for the saddle and riding but probably won't be riding them on a basis.


 Athena, you can see on her left leg you wouldn't even know she cut it all up the way she did and she walks like nothing happened!  We'll see how she fairs when she needs to trot/run.  Also, on the right leg you can see her gun shot wound is almost closed!!! YAY!!! Do you remember before?  How big it was?  It was bigger than my hand and in really poor shape.  She's even put on some healthy weight too!


Athena's first time training since we've brought her home.  She did soooo amazing!  Better than I would've thought!  We did find out her quirks working with her.  She was a little spooky at first but then she calmed right down.  She's going to need a lot more work than the boys but only because she was abused.  But who can blame her for getting upset?  Wouldn't you be scared a little bit if you were hit (not the good kind of reinforcement either) for doing things you thought were right?


Downunder Horsemanship with Clint Anderson

We took a trip to the State Fairgrounds this weekend, Clint Anderson was in town.  We were only going to go for Saturday but it was such good information we ended up going both days.  There were a few things that I wanted to get but they were a  little bit too expensive.  So I got some materials to make my own!  I'll post up the DIY on that a little later once I get them finished.  I did get a few pictures, video recording wasn't allowed (which is understandable), but it was still good information all the same!  The trainer we've been working with just happened to be sitting a little way down from us and come to find out my niece was working the concession stand!  Iowa is a small place after all!


Tuesday, June 12, 2012

Pheasant, Quail, Partridges

Look Who's Arrived!!

We got some new additions to the family last night.
Check out the new babies!

A little slice of Iowa.


On our way to pick up the new Pheasant, Quail and Partridges.  I loved out the land looked and thought I would share a little piece of Iowa!
This is part of the Turbine Farms, they're so pretty! Don't you think?


Transformed our tack room in the barn into a brooder for the new babies soon to arrive! 


 Partridge Chicks


Quail/Pheasant

(The little guy sitting by the feeder on the left is the runt of the flock, he wasn't looking so good when we picked him up but he perked up this morning after getting to his new home! You can see another closer picture below)
Want to name a few for us?  We have a lot! About 50 birds total! 
Suggest some names and we'll post a picture of them for you.


 Here's the littlest of the Quail flock, he wasn't feeling too good when he got home :( 
We snuggled him up under the heat lamp and he was pretty perky in the morning!


 Here's the Quail hiding out in the corner.


Here are the Pheasant babies, they're only a few days old but they sure are spunky!


Don't forget to leave a comment and help us name some birdies!


Monday, June 4, 2012

American Flag and Flowers


 We have been pretty busy lately,  we bought a bunch of flowers and for our anniversary Josh bought us a flag for our yard!


I planted some flowers in front of the house along the walkway.


 Just after we finished planting flowers and setting up the flag for our yard.
I love this picture!  What do you think? Isn't that sunset amazing?


 Making our mark! This was Josh's idea, I thought it was cute!


 This is the bench and flower box that was left on the property when we bought the house.  
I put it to good use!!


This flower box was hiding among some items that were left behind.  It's a little old and warn but I love it's antique charm!


 Everything we got done in 1 day!


My dad held a Car Show recently and we also went to the Vet for Belle's shots.  She wasn't feeling very well afterwards :(  I felt so bad there wasn't anyway I could make her feel better so we snuggled with her most of the day to try and give her some comfort.

 Belle trying to see where we are headed. She didn't look long cause the car was upsetting her tummy so she slept most of the time.


Snuggled up with her teddy.


Just couldn't find a comfortable way to lay because her stomach was hurting :(


Well that's most of what's been going on lately.

I do have a surprise though!  I'm going to be sharing recipes from my recipe box!
I was given a recipe box for Christmas and my Mother and Grandmother stuffed it with recipes from our family.  I'll be posting those soon!